Cleaning, Conserving and Researching Finds
Pages 125–133
If there is one subject that is guaranteed to get professional archaeologists blowing a gasket it is the approach of metal detectorists towards the cleaning and conservation of objects they find. As a chemist, I have to admit they have a point! So here is a simple guide to what the metal detectorist can safely do and what you should avoid like the plague. Always start with a close visual inspection of the object. Try to decide what metal it is made of and how fragile it is. Copper alloys like bronze (copper and tin) or brass (copper and zinc) go green in the soil and, in the case of Georgian copper coins, an ugly dark brown colour. Silver can be anywhere between “silver” and black, entirely depending on the soil conditions. Lead is very dense, quite soft and usually goes white in the ground, unless it is a quite recent loss. If the object is in a precarious state you ought to do nothing at all until it has been recorded. Both of us have broken ancient objects through being over eager, and neither of us is proud of it. Restrain yourself from doing any cleaning, bending, scratching or any form of intervention when in the field - bad things can quickly happen, and it is a shame if an object has survived for a thousand years in the soil only for you to break it within a minute of discovery. Take a deep breath and keep it safe until you get home! Make yourself a cleaning kit like the one shown in the photograph. It is very simple and is all you need to do a good job. The components are: tap water and a bit of washing up liquid (other brands are available!); an old
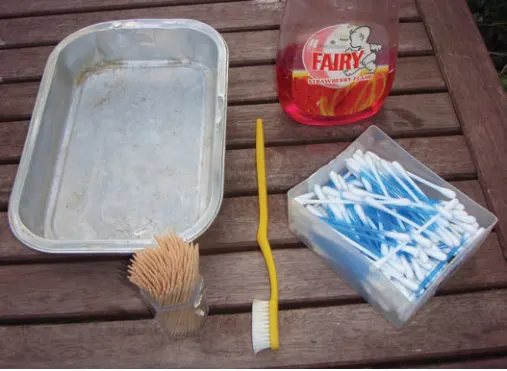
soft tooth-brush; cotton swabs (a must); wooden toothpicks; and some sort of deep tray, plastic being much better than aluminium. Never wash anything under a running tap as you might break a piece off or even wash something down the sink. Don’t laugh, for it really happens! Instead, put some tepid (not hot) water in your tray, with just a touch of detergent, and wash with your fi ngers. If the object is gilded be very careful indeed. Use the toothbrush gently. If you have a plastic tray then you can leave the object to soak, but not in an aluminium one as you will start off a chemical reaction which you really don’t want. Afterwards you can use the swabs to safely remove extra dirt. Be patient as it can take quite a time to remove all the dirt from a Roman coin. One of the golden rules of conservation is never to let two different metals be in contact with each other so this is why the toothpicks are so useful. If you want to pick out dirt or even small bits of corrosion then a metal needle will badly scratch the object and is not very good anyway. However, you can use the wooden toothpick without doing any damage to the metal, as long as you take your time and are not too aggressive! Wash your hands after cleaning metal objects. Heavy metals are toxic, and lead is the worst! Should I straighten my hammered coin? A surprising number of hammered coins are found bent to different degrees and this always tempers the joy of fi nding one. It is much more satisfying to display a fl at coin so, inevitably, the temptation is to think about straightening it. But should you? Well before you do anything, clean it up as best you can and try and identify it. If it’s rare and valuable then don’t even think about it! There are experts who, for a fee, will safely do this sort of thing for you, and if you snap it yourself then you will feel more than miserable. If the coin is not particularly unusual, then look at the metal. Gold will bend fairly easily but your coin is much more likely to be silver and this can be very brittle. Can you already see small cracks? If so, leave it alone. If not, and you are determined to “have a go” then photograph the object fi rst (so you have a record before you ruin it) and put the coin in some hot water for a few minutes. Get two fl at blocks of wood, or a couple of heavy books, and put some kitchen towel, or soft cloth, on them. Place the coin between them and apply some gentle yet fi rm pressure. Stop after a few moments, check the coin for cracks, reheat it and do it all again. Eventually it will either straighten or break!

Should I use silver polish on my coin? If it’s of any value you will instantly halve that value. If it’s not, then it’s up to you, but personally I would never do this. What should I do with Roman grots? After cleaning, decide if the coin is simply worn by being in circulation for a long time, or corroded by chemical reaction in the soil. There is nothing to be done to reverse the wear on a coin but there are a few things you can do about corrosion. Use a toothpick to remove any loose pieces. If it’s a valued coin then all you should then do is stabilise the coin against further corrosion, usually by storing it in a dry place. There are coin “dips” on the market, and these are fine to use if you can afford them. However, that should be the limit of your home chemistry! There are many, many amateur conservators out there each with their own foolproof way of cleaning up an old coin. Most of these techniques are ineffective, some damaging to the object, and a few downright dangerous! Don’t go using vinegar or lemon juice in an attempt to clean the coin, and don’t wrap coins in aluminium foil. Also, in my own view, do not go anywhere near ultrasound cleaners which, in my experience, cause far more damage than they reverse. Worst of all, do not try anything like electrolysis (i.e. using a battery and trying to reverse the corrosion). Try that with a salt solution and you will poison yourself with chlorine gas! My one concession is the use of a barrelling machine, which will cost about £70. But only barrel your grottiest coins that otherwise can give no information at all, and are of no value. These can clean up quite well and might enable you to identify an emperor or two. Such coins then make great gifts for children - perhaps as educational Christmas stocking fillers for younger members of the family? Is there nothing else I can do to improve the appearance of my objects? On a badly worn coin, particularly one which is quite dark in colour, the application of a little Vaseline can highlight the features; but ensure that the coin is completely dry before doing this as otherwise you can trap small amounts of moisture that will corrode the metal. One tip that was given to me, and which works well for regimental badges, is to apply the smallest amount of brown shoe polish and rub it in as


this, too, highlights detail. The point is that both of these methods are reversible and should not cause damage to a dry object.
General Coin Conservation
“At the British Museum our purpose for the Treasure process is to make coins identifiable without losing contextual information. Coins are examined for remains in the corrosion which might be the only evidence of a cloth bag or leather purse, etc. We aim to process hoards within a year of their arrival but the increased numbers being found has resulted in a huge backlog. Hoards, like Frome, jump the queue if they arrive wet as they are the most vulnerable to deterioration. Unfortunately, now even damp hoards have to wait their turn, stored in refrigerated conditions to inhibit mould growth while maintaining their humidity as wet deposits are easier to clean off than those that have dried on. Coins discovered in a pot are removed layer by layer as we have learnt that many hoards were put together sequentially or from different sources, the ratio of coin types being different from top to bottom.” Pippa Pierce, Conservator at the British Museum
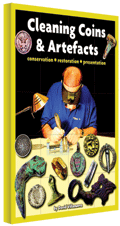
Finally, may I recommend a couple of publications? Firstly, on the left, a very useful (free!) little booklet produced by the PAS and aimed at metal detectorists; your friendly FLO should be able to get you a copy. If you want to know more about the subject, then there is this more detailed conservation guide (see appendix “Further Reading” for full details).
Recommended Reading
Two useful publications to read before doing anything more than gently washing a find.

Buy from Greenlight Publishing
Displaying Finds
I think displaying fi nds is very important, but it is an area where some detectorists lose the plot! To look at a well-constructed display of your best fi nds can give you pleasure years after you found them, and makes it easier to bore friends and family with your tales of epic discovery. However, after all the effort of buying the kit, getting permissions and spending endless hours fi nding nothing but cow pats, many detectorists just put their prizes in a plastic bag and forget them! What a shame! One easy solution for coins is the use of special stacking trays that can be bought from companies like Lindner. To give a little information on each item, I always include a little square of card with, on the front, a brief statement of what the object is and, on the back, when and where I found it along with the PAS database reference. You can also get cases, which are quite similar. These trays can also be used for small artefacts - anything from rings to coin weights - but they do have their limits and that is where things get a bit trickier.

For more bulky, or “three dimensional” items, you might go for a miniature chest of drawers from an antique or second hand furniture shop. Alternatively you can get ready made hinged display cases with glass tops. These can be just the thing if you want to show your items to the public when representing your club; but they might be less than ideal at home! You can use pins to hold items in position - partly to avoid damage and partly to show them off to best effect. However, never use metal pins as this can accelerate corrosion. Instead, use special plastic-coated ones that you will often see in museums - talk nicely to your FLO! There is no perfect display solution for larger objects, and you could do worse than ask other detectorists what they choose to do!
Researching Finds
I think this is one of the joys of the hobby! As you have no idea what you will find next you will have no idea where your research will take you. Objects tell a story, and it is not just the experts who can get a buzz by finding out what that story is; and in this information age it has never been easier to do! Books are still the best place to start. After a while you may well accumulate your own collection, or you may well find that your club owns copies of some of the more expensive books (if not, suggest it!). In the appendices we have included a “Further Reading” section that should help you along. When I bought my first machine I was persuaded to buy a copy of Spink’s Coins of England catalogue and also Benet’s Artefacts. The two together set me back some £50 but it was money very well spent - I fully recommend that you do the same! There is a really excellent monthly magazine (Treasure Hunting) published about our hobby. For more details go to: www.treasurehunting.co.uk A year’s subscription would be an ideal way to learn about the hobby and would make a good birthday or Christmas present if wife/husband or other relative is fishing for ideas! You will read thoughtful and informative articles, learn about up-coming rallies and, most importantly, see lots of finds and learn to recognise them. There are also several “popular archaeology” magazines available, which might be of interest to some people. They will often
include items of interest to metal detectorists, particularly if you want to learn more about the context of your finds. The best-selling of these is Current Archaeology When recording your finds that are over 300 years old with the PAS (and yes, we do want you to do that!), your FLO will write a little report for you about the object. The length (and quality) of these can vary, but at their best can give you a superb understanding of the object and its context - and you haven’t had to do any of the work! These reports will usually cite academic references that the FLO has used for research, and if you are really keen, or just a bit of a nerd like me, you could always get these references yourself! Of course, we then must come to the Internet and so I must start by stating the obvious - that any idiot can write anything about an object and it may be utter tosh. So be careful what you read (and believe)! Club sites often have photos of finds posted along with information and this can be useful. There are also commercial sites, both here and in the States, which can give images and descriptions. However, the one site you must become familiar with is the PAS database on finds.org.uk In its early form this was quite hard to use, but it has got a lot
better, and the sheer number of objects posted (nearing a million) allows you to look at images, and approximate find spots, of objects just like yours. To give you a real example of this, in Chapter 9 there is an image of a late Saxon “mask” pendant. When I found this I had never seen a parallel, but after half an hour on the PAS site I had found 11 similar objects and plotted their find spots (almost all in Wiltshire and Hampshire, which was interesting). There are also 13,000 images of Roman brooches although I wouldn’t fancy checking them all! The PAS site also has little “essays” written for detectorists by BM staff on subjects including Roman coinage and medieval hammered, and these are well worth reading (and printing off). There are also several metal detecting chat rooms where photos of objects can be exchanged and views asked for. This is a great thing, but be wary of “certain” identifications and remember that this is not a substitute for recording with the PAS! There is another type of research you can do, and that is to research the land where you are detecting. You might choose to do this before you get permission to detect, after permission but before detecting, or after the finds start appearing (perhaps to investigate a particular field). Nowadays your first stop ought to be Google Images to check for any crop marks that appear in aerial photographs. What is a crop mark, I hear you ask? Well, ground that has been disturbed by the building of a wall, for example, will always have a different make up from the ground on either side, even long after the wall has disappeared. This might make it retain water better, or worse, and mean that crops grow at a faster, or slower, rate along the line of the long lost wall. So, in times of drought, a photograph taken from the air will see a line of greener crop (or yellower crop) compared to the background. Hence, deserted buildings can give themselves away and this might be a good place to search! Then there are maps - new and old! A modern OS map (always use the “orange” 1:25,000 as they show field boundaries) will show footpaths and these can easily be medieval, and might have been busy thoroughfares between villages. Your farmer ought to be able to provide you with a copy of the farm map and, with a bit of luck, this might have individual field names on it. These could give you a clue about an earlier use for the land. Finally, you can always visit your county records office where detailed maps will be found back to the 18th century or even earlier. If you’ve never done this sort of thing before don’t worry, as
you will find the staff will fall over themselves to be helpful and to show you the ropes! It might be an idea to ring them in advance to see if they have the material you want, or any ideas of their own!